As these pages are being constantly updated, please make sure you refresh to get the latest version.
Terms & Conditions    Privacy Policy    Contact & Opening Hours

divider

Rainbow Valley Shop

Sunday/Monday - Closed
Tuesday to Friday - 9am to 12pm, 1pm to 5pm
Late Nights Tuesday/Wednesday - 7pm to 9pm
Saturday (October to June) - 10am to 12pm, 1pm to 4pm
Saturday (July to September) - 9am to 1pm

Learn to Crotat

Making Crotat Strings

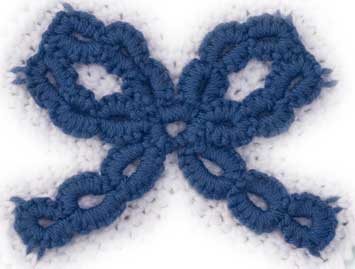
Crotat Bow

I have no idea what the "proper" name for this is.

My idea of a "String" is where you complete the 1st side of more than one ring, close the 1st ring then complete the 2nd side and close the rest of the rings in sequence.

It is a little fiddly but not difficult to do.

This bow is made using this technique.

We are going to make something a little simpler.

Snowflake

Rings 1-2: 3 ds, p, 3 ds, place marker, 4 ds, p, 4 ds, draw thread through to marker leaving both loops on hook, 3 ds, p, 3 ds, close ring.

Rings 3-10: 3 ds, jp, 3 ds, place marker, 4 ds, p, 4 ds, draw thread through to marker leaving both loops on hook, 3 ds, p, 3 ds, close ring.

Rings 11-12: 3 ds, jp, 3 ds, place marker, 4 ds, p, 4 ds,draw thread through to marker leaving both loops on hook, 3 ds, jpto ring 2, 3 ds, close ring.

Fasten off, tie ends together and sew them in.

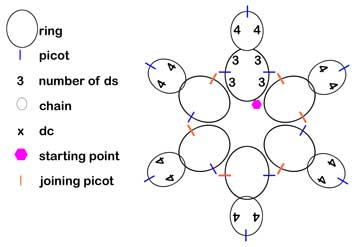
Crotat Snowflake stitch diagram

Crotat strings step 1
1.  Work 3 ds, p, 3 ds.  Place a piece of contrasting yarn over the yarn you are working with, sliding it up close to the last ds.

This is the 1st side of ring 2.

Crotat strings step 2
2.  Work 4 ds, p, 4 ds.  This is ring 1.Now comes the fiddly part.

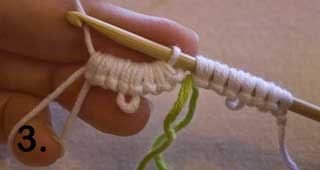
Crotat strings step 3
3.  You need to draw the yarn through the stitches up to the marker as if you are closing the ring, leaving the rest of the stitches on the hook.

Crotat strings step 4
4.  Tighten the loops on the hook as normal, taking care not to pull them too tightly as they are going to be the equivalent of another ds.  Leave both loops on the hook.  Remove marker.

Crotat strings step 5
5.  Work the next 3 ds, p, 3 ds.

Crotat strings step 6
6.  Close the ring as you would normally.

Crotat strings step 7
7.  The next 4 points - rings 3 to 10 - are worked in much the same way.  The only difference is that the very first picot is a joining picot.

Crotat strings step 8
8.  The 6th point is again similar with the 1st and last picots being joining picots.  Work them as you did for the flower.

Crotat strings step 9
If you want to be really brave, try making a string of three rings in one go.

Rings 1-3: 3 ds, p, 3 ds, place marker, 3 ds, p, 3 ds, place marker, 4 ds, p, 4 ds, draw thread through to marker leaving both loops on hook, 3 ds, p, 3 ds, draw thread through to marker leaving both loops on hook, 3 ds, p, 3 ds, close ring.

You should know enough now to be able to make this into another snowflake if you would like to.
The next technique is Multi-Coloured Crotat >>>>>>